
注釈
このプロジェクトはOSGeoLive仮想マシンディスク(VMDK)にのみ含まれています
actinia クイックスタート
Actiniaは、地理データのスケーラブルな分散・高性能処理のためのオープンソースのREST APIで、計算タスクには主に GRASS GIS を使用します。Actiniaは、衛星画像、時系列衛星画像データ、ベクタデータを処理するREST APIを提供しています。
目次
Actinia は様々な方法で利用されています。
curl などのコマンドラインツール
ブラウザ用の Postman または RESTman 拡張
GRASS GISセッションを開き、 ace (actiniaコマンド実行: actinia command execution)ツールを使用する
REST APIに対する他のインターフェース
このクイックスタートでは、GRASS GISを使用して、セッションから(GRASS GISを使用している) actinia サーバーへのコマンドを便利に起動します。このアイデアは、小さなデータ・セットに対してローカルでワークフローを迅速に開発し、それをサーバー上で実行するというものです。
Jupyter Notebookでactiniaを使用する
https://github.com/actinia-org/actinia-jupyter から、actinia用の多数のJupyterノートブックが利用可能です
ace - actinia コマンド実行の概要
ace ツール(詳細) は、単一のGRASS GISコマンドあるいはactinia RESTサービス(https://actinia.mundialis.de/) 上のGRASS GISコマンドのリストの実行を可能にします。さらに、ジョブ管理、ユーザがアクセスできる場所、マップセット、マップレイヤのリスト機能、およびマップセットの作成と削除も提供します。
ace ツールはアクティブなGRASS GISセッションで実行されなければなりません。g.extension extension=ace url=https://github.com/actinia-org/ace でインストールされます。
すべてのコマンドは、ephemeral データベースでデフォルトごとに実行されます。したがって、生成された出力は、拡張GRASSコマンドを使用してエクスポートする必要があります。
オプション mapset=MAPSET_NAME は、永続的なユーザーデータベースでコマンドを実行できるようにします。これは location=LOCATION_NAME オプションと一緒に使用することができます。
環境のセットアップ
GRASS GISセッションでは、必ず次のコマンドを実行してください。
ユーザは、次の環境変数を設定して、Actiniaサーバと認証情報を指定する必要があります:
# set credentials and REST server URL
export ACTINIA_USER='demouser'
export ACTINIA_PASSWORD='gu3st!pa55w0rd'
export ACTINIA_URL='https://actinia.mundialis.de/latest'
サンプルデータへのアクセス
選択したデータセットはデモユーザが使用できます。アクセスできる場所を一覧表示するには
ace -l
['latlong_wgs84', 'ECAD', 'nc_spm_08']
次のコマンドは、アクティブなGRASS GISセッション(nc_spm_08)内の現在位置のマップセットの一覧を表示します:
# running ace in the "nc_spm_08" location
# (the current location name is propagated to the server):
ace location="nc_spm_08" -m
['PERMANENT', 'landsat', 'modis_lst']
外部ソースからデータにアクセスする
actinia 固有の拡張機能で、GRASS GISコマンドは拡張されています。入力パラメータとして @ オペレータを指定することで、Webにあるリソースをインポートしたり、出力パラメータのエクスポートを指定することができます。
重要なことは、ローカルロケーションとマップセットの名前が、RESTサーバの名前と一致する必要があることです。
現在使用可能なデータセットは次のとおりです(投影法毎に整理):
ノースカロライナ州のサンプルデータセット(NC State-Plane metric CRS、EPSG:3358):
背景地図 (
nc_spm_08/PERMANENT; ソース: https://grassbook.org/datasets/datasets-3rd-edition/)ランドサットのサブシーン (
nc_spm_08/landsat; ソース: https://grass.osgeo.org/download/data/)
緯度-経度による位置指定 (緯経度 WGS84、EPSG:4326):
空 (
latlong_wgs84/PERMANENT/)16日間の NDVI、MOD13C1、V006、CMG 0.05 度解像度(
latlong_wgs84/modis_ndvi_global/; ソース: https://lpdaac.usgs.gov/products/mod13c1v006/)LST growing degree days asia 2017 (
latlong_wgs84/asia_gdd_2017/; source: https://www.mundialis.de/en/products/surface-temperature-data/)LST 熱帯日数 アジア 2017 (
latlong_wgs84/asia_tropical_2017/)LST 日次温度 アジア 2017、最小、最大、平均を含む (
latlong_wgs84/asia_lst_daily_2017/)
欧州 (EU LAEA CRS、EPSG:3035):
EU DEM 25m V1.1 (
eu_laea/PERMANENT/; source: https://land.copernicus.eu/en/products/products-that-are-no-longer-disseminated-on-the-clms-website)CORINE Landcover 2012, g100_clc12_V18_5 (
eu_laea/corine_2012/; source: https://land.copernicus.eu/en/products/corine-land-cover/clc-2012)
モルワイデ図法の世界地図 (EPSG 54009):
GHS_POP_GPW42015_GLOBE_R2015A_54009_250_v1_0 (
world_mollweide/pop_jrc; ソース: https://ghsl.jrc.ec.europa.eu/ghs_pop.php)
送信前にRESTコールを検査する
actinia 処理チェインのJSONリクエストを生成するには、 -d (ドライラン)フラグを追加するだけです:
ace location="nc_spm_08" grass_command="r.slope.aspect elevation=elevation slope=myslope" -d
マップ表示 - マップレンダリング
マップのレンダリングは非常に簡単(かつ高速)です:
# check amount of pixels, just FYI
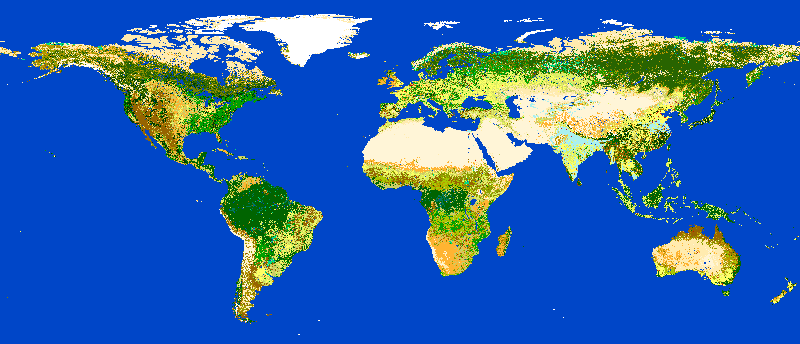
ace location="latlong_wgs84" grass_command="r.info globcover@globcover"
# render the map ... 7 billion pixels
ace location="latlong_wgs84" render_raster="globcover@globcover"

actinia による ESA Globcover マップの表示
一時的処理は、actinia のデフォルトの処理方法です。コマンドは、処理後に削除される一時マップセットで実行されます。GRASS GISモジュールの出力を書き出して、計算結果を保存し、ダウンロードしてさらに解析することができます。現在サポートされているエクスポートフォーマットは次のとおりです:
ラスタ:
COG、GTiffベクタ:
GPKG、GML、GeoJSON、ESRI_Shapefile表:
CSV、TXT
スクリプトの例
例1: 標高モデルからの勾配、アスペクト、および一変量統計の計算
次のコマンド(スクリプトに格納され、 ace で実行されます)は、インターネットの情報源からラスタレイヤをラスタマップ elev として読み込み、計算領域をマップに設定し勾配を計算します。ラスタレイヤに関する追加情報は r.info で要求されます。
次のスクリプトをテキストファイル ace_dtm_statistics.sh として保存します:
# grass ~/grassdata/nc_spm_08/user1/
# Import the web resource and set the region to the imported map
g.region raster=elev@https://storage.googleapis.com/graas-geodata/elev_ned_30m.tif -ap
# Compute univariate statistics
r.univar map=elev
r.info elev
# Compute the slope of the imported map and mark it for export as a COG file (Cloud Optimized GeoTIFF)
r.slope.aspect elevation=elev slope=slope_elev+COG
r.info slope_elev
テキストファイル内のスクリプトを /tmp/ace_dtm_statistics.sh に保存し、保存したスクリプトを次のように実行します。
ace --location nc_spm_08 --script ace_dtm_statistics.sh
結果(メッセージ、統計、ファイル)はRESTリソースとして提供されます。
actinia 処理チェインのJSONリクエストを生成するには、 -d (ドライラン)フラグを追加するだけです:
ace -d location="nc_spm_08" script="/tmp/ace_dtm_statistics.sh"
出力は次のようになります:
{
  "version": "1",
  "list": [
    {
      "module": "g.region",
      "id": "g.region_1804289383",
      "flags": "pa",
      "inputs": [
        {
          "import_descr": {
            "source": "https://storage.googleapis.com/graas-geodata/elev_ned_30m.tif",
            "type": "raster"
          },
          "param": "raster",
          "value": "elev"
        }
      ]
    },
    {
      "module": "r.univar",
      "id": "r.univar_1804289383",
      "inputs": [
        {
          "param": "map",
          "value": "elev"
        },
        {
          "param": "percentile",
          "value": "90"
        },
        {
          "param": "separator",
          "value": "pipe"
        }
      ]
    },
    {
      "module": "r.info",
      "id": "r.info_1804289383",
      "inputs": [
        {
          "param": "map",
          "value": "elev"
        }
      ]
    },
    {
      "module": "r.slope.aspect",
      "id": "r.slope.aspect_1804289383",
      "inputs": [
        {
          "param": "elevation",
          "value": "elev"
        },
        {
          "param": "format",
          "value": "degrees"
        },
        {
          "param": "precision",
          "value": "FCELL"
        },
        {
          "param": "zscale",
          "value": "1.0"
        },
        {
          "param": "min_slope",
          "value": "0.0"
        }
      ],
      "outputs": [
        {
          "export": {
            "format": "COG",
            "type": "raster"
          },
          "param": "slope",
          "value": "slope_elev"
        }
      ]
    },
    {
      "module": "r.info",
      "id": "r.info_1804289383",
      "inputs": [
        {
          "param": "map",
          "value": "slope_elev"
        }
      ]
    }
  ]
}
例2: オルソ写真画像のセグメント化とエキスポート
次のスクリプトをテキストファイル /tmp/ace_segmentation.sh として保存してください:
# grass ~/grassdata/nc_spm_08/user1/
# Import the web resource and set the region to the imported map
# we apply a importer trick for the import of multi-band GeoTIFFs:
# install with: g.extension importer url=https://github.com/actinia-org/importer
importer raster=ortho2010@https://apps.mundialis.de/workshops/osgeo_ireland2017/north_carolina/ortho2010_t792_subset_20cm.tif
# The importer has created three new raster maps, one for each band in the geotiff file
# stored them in an image group
r.info map=ortho2010.1
r.info map=ortho2010.2
r.info map=ortho2010.3
# Set the region and resolution
g.region raster=ortho2010.1 res=1 -p
# Note: the RGB bands are organized as a group
# export as a as COG file (Cloud Optimized GeoTIFF)
i.segment group=ortho2010 threshold=0.25 output=ortho2010_segment_25+COG goodness=ortho2010_seg_25_fit+COG
# Finally vectorize segments with r.to.vect and export as a GeoJSON file
r.to.vect input=ortho2010_segment_25 type=area output=ortho2010_segment_25+GeoJSON
テキストファイルに保存されているスクリプトを次のように実行します
ace location="nc_spm_08" script="/tmp/ace_segmentation.sh"
結果(メッセージ、統計、ファイル)はRESTリソースとして提供されます。
永続処理の例
GRASS GISコマンドは、ユーザ固有の永続データベースで実行できます。ユーザは既存の場所にマップセットを作成する必要があります。このマップセットには ace を介してアクセスできます。このマップセットで実行されるコマンドのすべての処理結果は、永続的に格納されます。処理後に正しい名前を使用して永続ストレージに移動される一時的なデータベースで処理が実行されることに注意してください。
test_mapset という名前で nc_spm_08 という場所に新しいマップセットを作成するには、以下のコマンドを実行する必要があります。
ace location="nc_spm_08" create_mapset="test_mapset"
新しい永続マップセット内の統計スクリプトからコマンドを実行します。
ace location="nc_spm_08" mapset="test_mapset" script="/path/to/ace_dtm_statistics.sh"
test_mapset 内のスクリプトで作成されたすべてのラスタマップを表示します。
ace location="nc_spm_08" mapset="test_mapset" grass_commmand="g.list type=raster mapset=test_mapset"
ラスタマップの高度と slope_elev に関する情報を表示する
ace location="nc_spm_08" mapset="test_mapset" grass_command="r.info elev@test_mapset"
ace location="nc_spm_08" mapset="test_mapset" grass_command="r.info slope_elev@test_mapset"
test_mapset を削除します(削除時は常に名前をダブルチェックします)。
ace location="nc_spm_08" delete_mapset="test_mapset"
アクティブなGRASS GISセッションに同一のロケーション/マップセット名がある場合は、エイリアスを使用して、各コマンド呼び出しの永続オプションを回避できます。
alias acp="ace --persistent `g.mapset -p`"
アクティブなGRASS GISセッションでは、現在の場所は nc_spm_08 であり、現在のマップセットは test_mapset であると仮定します。上記のコマンドは、次のように実行できます:
ace location="nc_spm_08" create_mapset="test_mapset"
acp location="nc_spm_08" script="/path/to/ace_dtm_statistics.sh"
acp location="nc_spm_08" grass_command="g.list type=raster mapset=test_mapset"
acp location="nc_spm_08" grass_command="r.info elev@test_mapset"
acp location="nc_spm_08" grass_command="r.info slope_elev@test_mapset"
試してみること
Docker ComposeでOSGeoLive VMにインストール
必要条件: docker と docker-compose (OSGeoLive VM版ではすでに利用可能)
actiniaをビルド・デプロイするには、以下を実行します
git clone https://github.com/actinia-org/actinia-core.git
cd actinia_core
docker-compose -f docker/docker-compose.yml up
これでローカル環境でactiniaインスタンスが動作するようになりました!確認してみましょう
curl http://127.0.0.1:8088/api/v3/version
新しい場所の作成
# (note: the "demouser" is not enabled for this)
#
# create new location
ace create_location="mylatlon 4326"
# create new mapset within location
ace location="mylatlon" create_mapset="user1"
GRASS GISアドオン(拡張機能)のインストール
# (requires elevated user privileges)
#
# list existing addons, see also
# https://grass.osgeo.org/grass-stable/manuals/addons/
ace location="latlong_wgs84" grass_command="g.extension -l"

# install machine learning addon r.learn.ml2
ace location="latlong_wgs84" grass_command="g.extension extension=\"r.learn.ml2\""
次のステップは何?
actinia webサイト: https://actinia.mundialis.de
actinia チュートリアル: https://neteler.gitlab.io/actinia-introduction
Further reading: Neteler, M., Gebbert, S., Tawalika, C., Bettge, A., Benelcadi, H., Löw, F., Adams, T, Paulsen, H. (2019). Actinia: cloud based geoprocessing. In Proc. of the 2019 conference on Big Data from Space (BiDS'2019) (pp. 41-44). EUR 29660 EN, Publications Office of the European Union 5, Luxembourg: P. Soille, S. Loekken, and S. Albani (Eds.). (DOI)
