

GDAL/OGR Quickstart
This Quick Start is divided into two parts: GDAL (raster data) and OGR (vector data).
This Quick Start describes how to:
- GDAL
Explore your image data with gdalinfo
Format translations with gdal_translate
Reproject your data with gdalwarp
Mosaic your data with gdal_warp or gdal_merge.py
Build a shapefile as a raster tileindex with gdaltindex
- OGR
get information about your data with ogrinfo
use ogr2ogr to transform your data to other formats
The only thing you’ll need for this quickstart is a terminal. If you want to visualize the results, you can use one of the Desktop GIS Software applications on OSGeoLive like QGIS.
Contents
Get to know GDAL
You will find the demo data at /usr/local/share/data. We want to have a
look at the Natural Earth data in this quickstart. We want to work with a
copy of the data. So the first step is to copy the data to your home
directory.
cd /home/user
cp -R /usr/local/share/data/natural_earth2/ ./gdal_natural_earth
You will then find a NaturalEarth Raster file and a .tfw World-file at:
cd /home/user/gdal_natural_earth
ls HYP_50M_SR_W.*
Tip
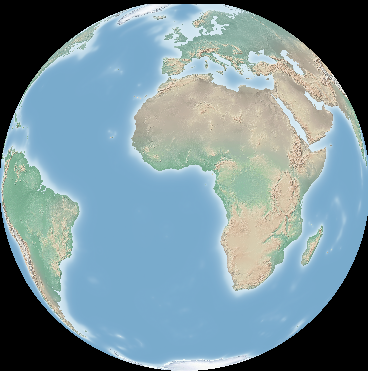
Open the file with a Desktop GIS like QGIS, and have a look.
Get information about the raster data with gdalinfo
gdalinfo HYP_50M_SR_W.tif
  Driver: GTiff/GeoTIFF
  Files: HYP_50M_SR_W.tif
  Size is 10800, 5400
  Coordinate System is:
  GEOGCRS["WGS 84",
      ENSEMBLE["World Geodetic System 1984 ensemble",
...
  Origin = (-179.999999999999972,90.000000000000000)
  Pixel Size = (0.033333333333330,-0.033333333333330)
  Metadata:
    TIFFTAG_SOFTWARE=Adobe Photoshop CS5 Macintosh
    TIFFTAG_DATETIME=2012:07:16 09:16:14
    TIFFTAG_XRESOLUTION=342.85699
    TIFFTAG_YRESOLUTION=342.85699
    TIFFTAG_RESOLUTIONUNIT=2 (pixels/inch)
    AREA_OR_POINT=Area
  Image Structure Metadata:
    SOURCE_COLOR_SPACE=YCbCr
    COMPRESSION=YCbCr JPEG
    INTERLEAVE=PIXEL
    JPEG_QUALITY=90
    JPEGTABLESMODE=3
  Corner Coordinates:
  Upper Left  (-180.0000000,  90.0000000) (180d 0' 0.00"W, 90d 0' 0.00"N)
  Lower Left  (-180.0000000, -90.0000000) (180d 0' 0.00"W, 90d 0' 0.00"S)
  Upper Right ( 180.0000000,  90.0000000) (180d 0' 0.00"E, 90d 0' 0.00"N)
  Lower Right ( 180.0000000, -90.0000000) (180d 0' 0.00"E, 90d 0' 0.00"S)
  Center      (  -0.0000000,   0.0000000) (  0d 0' 0.00"W,  0d 0' 0.00"N)
  Band 1 Block=256x256 Type=Byte, ColorInterp=Red
  Band 2 Block=256x256 Type=Byte, ColorInterp=Green
  Band 3 Block=256x256 Type=Byte, ColorInterp=Blue
- Note:
Driver is “GTiff/GeoTIFF”
Size is 10800x5400
3 Bands of type Byte.
Coordinates
no coordinate system
Simple format translation
First get to know your drivers. The –formats command line switch of gdal_translate can be used to see a list of available format drivers.
- Each format reports if it supports the following features:
read only (ro)
read/write (rw)
read/write/update (rw+)
supports virtual file systems (v)
supports subdatasets (s)
gdal_translate --formats
The –format command line switch can be used to query details about a particular driver, including creation options, and permitted data types.
gdalinfo --format jpeg
gdal_translate --format png
Translation
Translations are accomplished with the gdal_translate command. The default output format is GeoTIFF. The -of flag is used to select an output format and the -co flag is used to specify a creation option:
gdal_translate -of JPEG -co QUALITY=40 HYP_50M_SR_W.tif HYP_50M_SR_W.jpg
The -ot switch can be used to alter the output data type.
gdal_translate -ot Int16 HYP_50M_SR_W.tif HYP_50M_SR_W_Int16.tif
Use gdalinfo to verify data type.
Rescaling
The -outsize switch can be used to set the size of the output file.
gdal_translate -outsize 50% 50% HYP_50M_SR_W.tif HYP_50M_SR_W_small.tif
Use gdalinfo to verify the size.
The -scale switch can be used to rescale data. Explicit control of the input and output ranges is also available. The gdalinfo -mm switch can be used to see pixel min/max values.
Let’s split our image into two with -srcwin which makes a copy based on pixel/line location (xoff yoff xsize ysize). You also could use -projwin and define the corners in georeferenced coordinates (ulx uly lrx lry).
gdalinfo -mm HYP_50M_SR_W.tif
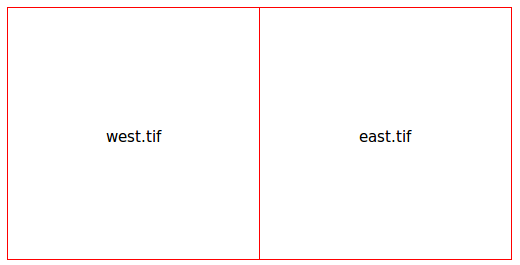
gdal_translate -srcwin 0 0 5400 5400 HYP_50M_SR_W.tif west.tif
gdal_translate -srcwin 5400 0 5400 5400 HYP_50M_SR_W.tif east.tif
Raster tileindex with gdaltindex
You can build a shapefile as a raster tileindex. For every image a polygon is generated with the bounds of the extent of the polygon and the path to the file.
gdaltindex index_natural_earth.shp *st.tif
Have a look at your output shapefile with QGIS and ogrinfo (you will learn more about ogrinfo later in this tutorial)
ogrinfo index_natural_earth.shp index_natural_earth
INFO: Open of `index_natural_earth.shp'
    using driver `ESRI Shapefile' successful.

Layer name: index_natural_earth
Metadata:
  DBF_DATE_LAST_UPDATE=2025-05-13
Geometry: Polygon
Feature Count: 2
Extent: (-180.000000, -90.000000) - (180.000000, 90.000000)
Layer SRS WKT:
GEOGCRS["WGS 84",
    ...
location: String (254.0)
OGRFeature(index_natural_earth):0
  location (String) = west.tif
  POLYGON ((-180 90.0,-0.000000000017963 90.0,-0.000000000017963 -89.999999999982,-180 -89.999999999982,-180 90.0))

OGRFeature(index_natural_earth):1
  location (String) = east.tif
  POLYGON ((-0.000000000017963 90.0,179.999999999964 90.0,179.999999999964 -89.999999999982,-0.000000000017963 -89.999999999982,-0.000000000017963 90.0))
Reprojecting
For this process we assume that HYP_50M_SR_W.tif has been properly created with bounds.
The gdalwarp command can be used to reproject images. Here we reproject the WGS84 geographic image to the Mercator projection:
gdalwarp -t_srs '+proj=merc +datum=WGS84' HYP_50M_SR_W_4326.tif mercator.tif
Use gdalinfo to verify the change and have a look at the image.

Here we reproject to the Ortho projection.
gdalwarp -t_srs '+proj=ortho +datum=WGS84' HYP_50M_SR_W_4326.tif ortho.tif
Note how the poles are clipped? This is because the edges at the pole can’t be reprojected gdalwarp does not read all the data. We can force gdalwarp to read a bunch of surplus data around chunks as one way to resolve this.
Mosaicking
gdal_merge.py is a python script that can be used for simple mosaicking tasks. Mosaic the east.tif and west.tif into a single file:
gdal_merge.py east.tif west.tif -o merged.tif
The same task can be accomplished with gdalwarp. gdalwarp has a variety of advantages over gdal_merge, but can be slow to merge many files:
gdalwarp east.tif west.tif warpmerged.tif
Get to know OGR
cd /home/user/gdal_natural_earth/
Tip
Open the shape file with a Desktop GIS like QGIS, and have a look.
Get information about the vector data with ogrinfo
ogrinfo -ro /home/user/gdal_natural_earth
INFO: Open of `/home/user/gdal_natural_earth'
      using driver `ESRI Shapefile' successful.
1: ne_10m_geography_regions_polys (Polygon)
2: ne_10m_populated_places (Point)
3: ne_10m_urban_areas (Polygon)
4: ne_10m_geography_marine_polys (Polygon)
5: ne_10m_admin_1_states_provinces_shp (Polygon)
6: ne_10m_admin_0_countries (Polygon)
7: ne_10m_ocean (Polygon)
8: ne_10m_rivers_lake_centerlines (Line String)
9: ne_10m_land (Polygon)
10: index_natural_earth (Polygon)
11: ne_10m_geography_regions_elevation_points (Point)
12: ne_10m_geography_regions_points (Point)
13: ne_10m_lakes (Polygon)
Get a summary about your data with ogrinfo together with -so.
ogrinfo -ro -so ne_10m_admin_0_countries.shp ne_10m_admin_0_countries
INFO: Open of `ne_10m_admin_0_countries.shp'
      using driver `ESRI Shapefile' successful.

Layer name: ne_10m_admin_0_countries
Metadata:
  DBF_DATE_LAST_UPDATE=2012-11-05
Geometry: Polygon
Feature Count: 254
Extent: (-180.000000, -90.000000) - (180.000000, 83.634101)
Layer SRS WKT:
GEOGCRS["WGS 84",
    DATUM["World Geodetic System 1984",
...
scalerank: Integer (4.0)
featurecla: String (30.0)
labelrank: Real (16.6)
sovereignt: String (254.0)
sov_a3: String (254.0)
adm0_dif: Real (16.6)
level: Real (16.6)
type: String (254.0)
admin: String (254.0)
adm0_a3: String (254.0)
geou_dif: Real (16.6)
geounit: String (254.0)
gu_a3: String (254.0)
su_dif: Real (16.6)
subunit: String (254.0)
su_a3: String (254.0)
brk_diff: Real (16.6)
name: String (254.0)
name_long: String (254.0)
brk_a3: String (254.0)
brk_name: String (254.0)
brk_group: String (254.0)
abbrev: String (254.0)
postal: String (254.0)
formal_en: String (254.0)
formal_fr: String (254.0)
note_adm0: String (254.0)
note_brk: String (254.0)
name_sort: String (254.0)
name_alt: String (254.0)
mapcolor7: Real (16.6)
mapcolor8: Real (16.6)
mapcolor9: Real (16.6)
mapcolor13: Real (16.6)
pop_est: Real (16.6)
gdp_md_est: Real (16.6)
pop_year: Real (16.6)
lastcensus: Real (16.6)
gdp_year: Real (16.6)
economy: String (254.0)
income_grp: String (254.0)
wikipedia: Real (16.6)
fips_10: String (254.0)
iso_a2: String (254.0)
iso_a3: String (254.0)
iso_n3: String (254.0)
un_a3: String (254.0)
wb_a2: String (254.0)
wb_a3: String (254.0)
woe_id: Real (16.6)
adm0_a3_is: String (254.0)
adm0_a3_us: String (254.0)
adm0_a3_un: Real (16.6)
adm0_a3_wb: Real (16.6)
continent: String (254.0)
region_un: String (254.0)
subregion: String (254.0)
region_wb: String (254.0)
name_len: Real (16.6)
long_len: Real (16.6)
abbrev_len: Real (16.6)
tiny: Real (16.6)
homepart: Real (16.6)
If you run ogrinfo without a parameter you will get a summary about your data and afterwards a section for every dataset.
ogrinfo -ro ne_10m_admin_0_countries.shp ne_10m_admin_0_countries
You can forward the result from ogrinfo to grep to filter and get only the attribute COUNTRY.
ogrinfo ne_10m_admin_0_countries.shp ne_10m_admin_0_countries | grep 'admin '

  admin (String) = Aruba
  admin (String) = Afghanistan
  admin (String) = Angola
  admin (String) = Anguilla
  admin (String) = Albania
  admin (String) = Aland
  admin (String) = Andorra
etc.
You can convert your data to other formats. Get the list of the supported formats with –formats.
Use ogr2ogr to convert data between file formats
You can use ogr2ogr to converts simple features data between file formats. You can use –formats to get the list of the supported formats with read/write information.
Convert the countries to GML.
ogr2ogr --formats
ogr2ogr -f GML countries.xml ne_10m_admin_0_countries.shp
Things to try
Here are some additional challenges for you to try:
Try gdalwarp or gdal_merge.py to mosaic your data
Try gdaladdo to build internal overviews
QGIS uses GDAL/OGR too to suport many formats. It also provides the GdalTools Plugin to process raster data. This plugin integrates the gdal-tools into QGIS.
Try ogr2ogr to import/export your vector data to other formats like PostGIS. Have a look at the options ogr2ogr provides.
Try the QGIS plugin OGR-Layer-Konverter.
What next?
This is only the first step on the road to using GDAL and OGR. There is a lot more functionality you can try.
GDAL Project home
GDAL Raster Tutorial
GDAL Workshop